FAULTY AND REPAIR SOLUTIONS.

PROCEDURE- OPEN BLACK COVER WITH HELP OF FLATTED SCREW DRIVER VERY SLOWLY BY SIDE SIDE (CONTAINS ANY ALPHABATES). AND SEE INTO IT LIKE THIS (IN PIC).
HELPFUL IN EXPLORATION AND UNDERSTANDING YOUR LAPTOP KEYBOARD.
NO OF FAULTS-
Replace a Keyboard Key On Your Own
Step 1:
Remove the work key Form Key so that only the cover comes off, leaving the inside intact. This will help you to know exactly how the broken key should be put back.


Step 2:
Identify the Key Retainers (small plastic parts) that hold the rubber gasket in place. Most likely there will be two pieces that interlock together and snap in place at four different points. Use tweezers to gently lift the retainers up and make sure you take into account how they link and where they snap together.


Step 3:
Similarly, use tweezers to unsnap the retainers you need to replace the rubber gasket underneath. Start by separating the outer retainer from inner retainer, one side at a time. Finish removing the final gasket by softly pulling it out with your fingers.

Step 4:
Assemble the plastic key retainers to reassemble the working key if the retainers are being replaced. If the rubber gasket needs replacing, remove the worn piece and replace it with a new one.
You can buy individual keys or rubber gaskets on eBay or Amazon.
Step 5:
Push the key retainers gently over the rubber gasket until it snaps into proper place on the keyboard. Follow the reverse procedure starting with the retainers, link them together, snapping one end in at a time, sliding the retainers over the gasket and then snapping the other end onto the keyboard base.
Step 6:
Snap the key cover back on. Gently push until you feel the key cover snap into place.
Check for Crumbs

Hold your keyboard (or laptop) upside down, or at the very least at a 45- to 75-degree angle from horizontal and give it a good shake. Sometimes crumbs from working lunches or your last snack break can get stuck under the keys. This is more of a problem for older laptops, but it's worth a shot even on a new one.
If you have a keyboard vacuum or a can of compressed air, give the nooks and crannies of your keyboard a quick cleaning. If one or two keys are stuck because of soda spillage, pop the offending key cap off the keyboard (if that's an option) and try to clean as much dried liquid from the key switch as possible.
Dab some rubbing alcohol or soapy water on a ragnot onto the keyboardand clean away the sticky residue. A cotton swab can also come in handy here, just be careful and don't disassemble the key switch unless you know what you're doing.
If an extensive section of the keyboard is stuck because of liquid damage, like a spilled cup of soda or coffee, your best recourse may be to have the keyboard assembly replaced.
Some keys on my laptop aren't working properly, including Z, 7, F5, F8, Fn etc. Can some key combinations be used to type those without using an on-screen keyboard?
A computer keyboard consists of many switches, one for each key which you can press. All of these switches are electrically arranged into groups. For discussion purposes, we call these groups rows and columns, but those groups do not physically correspond to the physical location of the key on the keyboard.
Below is an example schematic diagram showing how the switches in a specific keyboard were arranged.
A special integrated circuit is built into your laptops motherboard. (For desktop computers, an equivalent integrated circuit is inside of the keyboard itself.) This integrated circuit has the job of constantly scanning the keyboard to look at which switches are currently pressed. It does this by momentarily sending out a signal along the wiring feeding each column of the keyboard, one column at a time, and looking for a return signal from the wires connected to each of the rows. When it finds a return signal, the currently activated column and the row which has a return signal identify which key is currently being pressed. The keyboard controller integrated circuit uses this information along with a table of values describing the arrangement of the key switches in the keyboard to return a specific code number to the computer identifying the key in a standardized way.
If the wiring connected to either a column or a row of the keyboard becomes damaged, it will affect every key in that specific column or row. In the example schematic above, if the wire identified as 1Y0 had been cut, the keyboard keys for N, H, Y, 6, B, G, T, and 5 would all be disabled. There is no possibility of generating the same signals those specific keys would have created without repairing or replacing the damaged part.
So, no, there is no combination of keys which you could type to get those keys to come back.
But, not all hope is lost.
Generally, when a laptop keyboard has stopped functioning in the way yours has, it is because something was spilled into the keyboard, and that something has either created a short-circuit killing a column or row or has gotten intot he connector for the keyboard cable, preventing a signal from being transmitted properly.
This can sometimes be corrected by following the disassembly procedures for your specific make and model of laptop to remove the keyboard and then spraying the keyboard connector (on the motherboard) with a non-residue contact cleaning solution
. Sometimes the keyboard can be salvaged using contact cleaner as well. (I say sometimes, because it is often difficult to get the contact cleaner to fully penetrate into the keyboard, as you cannot disassemble the keyboard itself. As such, it is usually better to replace the keyboard.)
If you were to do this repair yourself, the total cost would be around $30 USD. If you take it to a repair shop, it will cost you a bit more as they have to charge for labor. If you are uncomfortable working inside of computer devices (which includes many very small, easy to lose screws and other components as well as easily broken cables and connectors) then take your machine to someone who has some experience.
As an alternative, it is also possible to simply connect an external USB keyboard
to your laptop. While this will not fix the damage to your laptop and can be cumbersome with a machine you bought for its mobility, it will provide you with an alternative keyboard which is working at, potentially, an even lower price.Moisture
When we are working on a project, it is likely we have a cup of beverage by our side to keep us awake and hydrated. But mishaps happen and the beverage gets toppled and spills all over the laptop keyboard keys. Even though you have cleaned the keys thoroughly or the crevice in between them, liquid may seep in between the main casing of the keyboard. Over time, it turns into gunk or rust. Worst of all, it becomes a chunk of goop that stains the circuit board and results in your laptop keyboard not working properly. It is best to check with our specialist and have your laptop be in professional hands to do Water Cleaning for you. A thorough check on the motherboard and circuitry will be ideal. It will help ensure your laptop is long lasting as per you first bought.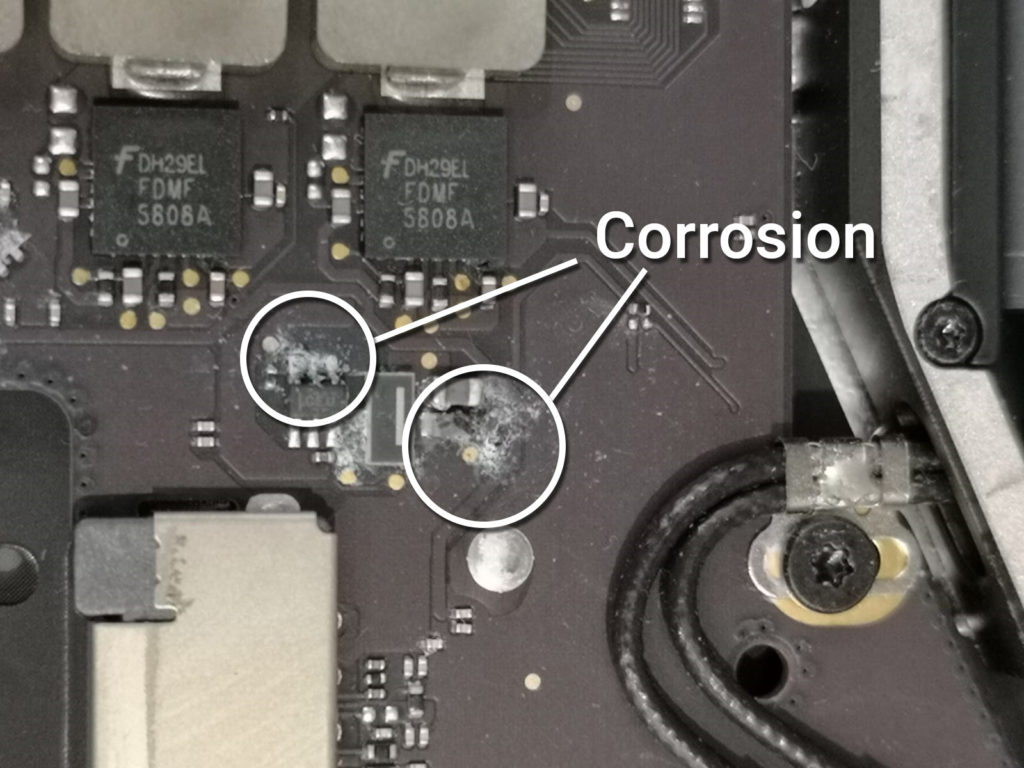
Short circuit
The motherboard of a laptop is the main board that communicates between every component in your device. It is also the most vulnerable and can easily short circuit. It can happen anytime and varies from water spillage or unexpected electric shortage in your home or office.Your laptop keyboard not working may be one of the results after a short circuit. That is not the worst case scenario as a hard disk failure could be worse, trust me. When your laptop keyboard is not working, the likely hood to change out a new keyboard and call it a day is very high. It is usually the connector in between the motherboard and the circuit behind the keyboard that is damage and so it is an easy fix.1. Overheating Damages Motherboard

Heat is a common enemy for electronic devices. But it may seem like electronic devices are fond of generating heat. Overheating cause damage to the motherboard. When you do some power-intensive work like graphics designing or play heavy games, motherboard overheating occurs. So, the heat needs to be dissipated. It can be done by using fans or heat sinks.
Overheating sometimes bends the motherboards small parts which may damage the motherboard. Because motherboard is so sensitive that a simple loose or improper connection often become a great factor in terms of the damaging motherboard. So, you should take proper steps to cool down the motherboard. After regular intervals of some days, you should clean your desktops or laptops ventilation outlets.
2. Bad Power Supply Damage Motherboard

Can a faulty psu damage motherboard? Computers power supply unit (PSU) is connected to the motherboard. You must buy the right power supply for your PC. If the PSU cannot provide the required power needed by the components of the computer, motherboard and other components fail to perform and thus damage the motherboard.
But generally, power surges do the main damage to the motherboard. What is power surges? You are quite familiar with this. Some power intensive electrical devices like refrigerators, air conditioner draw more power than other electrical devices. You might observe when you turn off these devices, light flickers. It is because when they are switched off, it takes a few moments to adjust the current supply. In those moments, more power is redirected to other electrical devices like light or your computer. This phenomenon is known as a power surge. So the power setup should be perfect.
Most PSU and motherboard can adjust with small power surges. But if it becomes huge, it can fully damage your motherboard and other components connected to it. You can be quite tension free if you use a surge protector to give power supply to your computer. This will only cost you about 10-15$ to buy a good surge protector. So, you must have idea on how to know if your power supply is compatible with your motherboard. Also check the power cable always.
3. Dust Damage Motherboard

Dust is a common enemy for electronic devices. If you havent washed your computer for a long time, we suggest you do that. It can cause a loose connection of other components to the motherboard. Again, dust cause problem in the ventilation system of your PC and result in overheating. If you dont want to cause damage to your computer, we suggest you wash your computer (both internally and externally) after a regular interval.
4. Motherboard Damage Check
If your computers motherboard is damaged, you may encounter a lot of issues. Among them, to test if a motherboard is dead or damaged, some of the issues are given below:
- If motherboard failure occurs, instead of booting the operating system of your computer, you will get a beep code. A bluescreen can only be shown.
- Your computer may randomly crash and cause general protection fault error code messages or fatal exceptions etcetera.
- Your computer may randomly reboot if your faulty computers motherboard.
If you encounter those issues, dont think that your motherboard is damaged. You can face these issues if your other PC components get damaged.
You can check for several things to find out that your motherboard is damaged or is not in good condition.
- Visual Check: It is the first thing you need to do to check a faulty motherboard. A common cause of failure of the motherboard is bulged or blown capacitors. Check each of the capacitors whether it is bulging or leaking. If you find any of these in any of the capacitors, then your motherboard is damaged. Replacing of a bulging or blown capacitor may be possible. But this requires precision soldering. If you dont find any damages, you have to use software utility or hardware diagnostic tools.
- Using software and other hardware diagnostic tools to dentify bad motherboard: Some examples of software and diagnostic tools are given below
- Hot CPU Tester: It is a great software that can test your computer motherboard. It is easy to use. It includes a burn-in feature for a new.
- PC-Doctor: It is a great motherboard diagnostic tool. But it is not cheap. It is often used by service centers and technicians to diagnose hardware.
- Ultra-X: This hardware diagnostic tool can check your motherboard whether it is damaged or not.
5. Bad CPU Damage Motherboard
Central Processing Unit is connected to the motherboard. So, can a bad cpu damage a motherboard? Normally, a CPU doesnt harm your motherboard unless it is badly damaged. If the CPU is badly damaged in such a way that it is shorted to the ground, there is a huge possibility of your motherboard gets fried out. If you think that your processor is damaged or harmed by any other causes, then you should at once change the CPU. You should also check the connection of the processor, the CPU cooler and the thermal paste that is used. You must always use the proper thermal paste for better heat sinking.